
In this article, I will cover the steps I took in OpenMediaVault to export all the data from Firefly-III to Unraid on my new server, EVE 6, a ZimaBlade powered by Unraid . As I transition to this new setup, I document my process and progress to facilitate future improvements and enhancements. I also hope this article will inspire others to tackle similar projects.
The Firefly-III data transfer process can be accomplished in several ways: exporting Firefly III data via the CLI using a token and then importing it with the Firefly III importer, exporting the database directly, or moving the container from one server to another, which is the approach we will be working on.
Transfer Firefly III Container from OpenMediaVault to Unraid
Before initiating the export process, please verify that your system has enabled the following prerequisites. This will help prevent errors and ensure a smooth transfer:
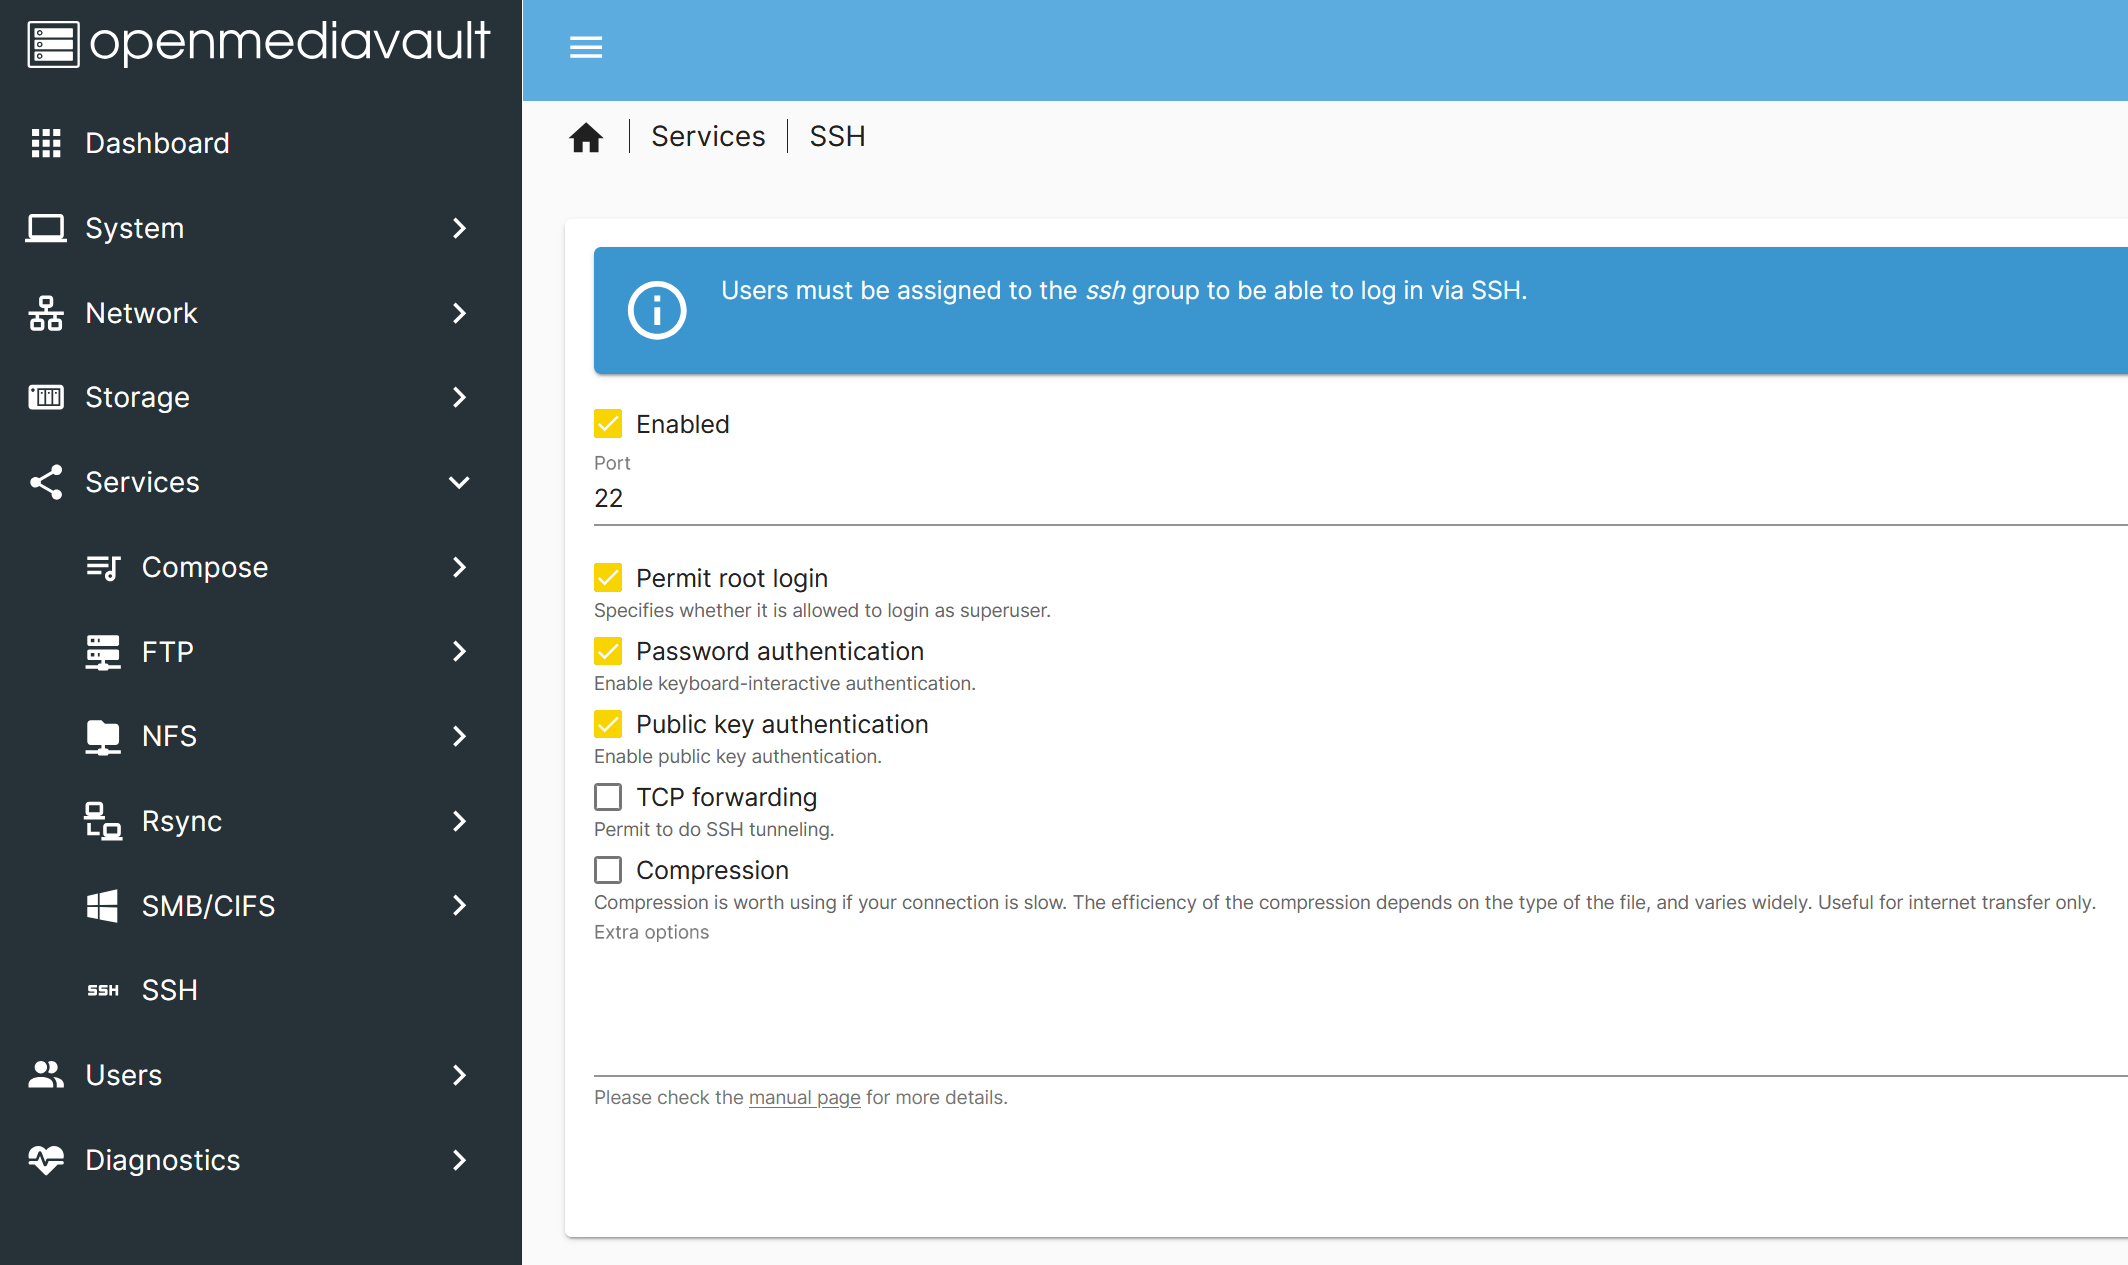
Enabling SSH and FTP in OpenMediaVault
To prepare for the export process, enable SSH and FTP in OpenMediaVault, specifically for the shared folder where the Docker containers are stored. This will allow you to access the Firefly III data via SSH’s command-line interface (CLI) and transfer the files to your local machine via FTP.
To enable FTP in OpenMediaVault, follow these steps:
- Navigate to Services > FTP > Settings.
- Click on the Enabled checkbox to activate FTP.
- In the Advanced settings section, ensure that Permit root login is enabled.

To enable SSH in OpenMediaVault, follow these steps:
- Navigate to Services > SSH.
- Check the Enabled box to activate SSH.
Retrieve Database Credentials from Portainer in OpenMediaVault
Note: This step is only necessary if you migrate your existing Firefly III instance to a new Docker. You can skip this step if you are creating a new instance in Unraid.
To retrieve the database credentials, follow these steps:
- In Portainer, locate the Firefly III container and click on the Inspect icon in the Quick Actions tab.

- To make it easier to analyze the configuration, switch the view from Tree to Text.
- Gather the following information, which will be used to configure the new Docker container in Unraid:
MYSQL_DATABASEMYSQL_USERMYSQL_PASSWORD
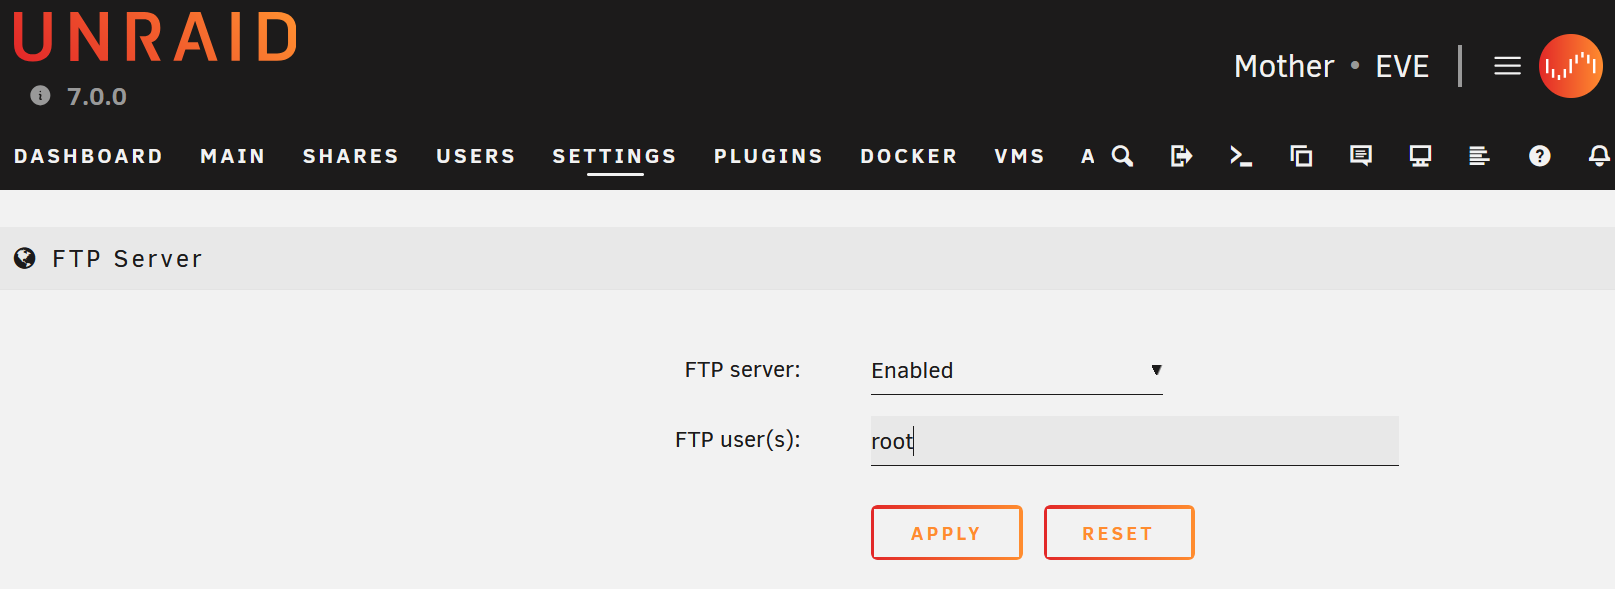
Enable FTP in Unraid
To enable FTP in Unraid, follow these steps:
- Log in to Unraid and click on the SETTINGS tab.
- Under Network Services, click on FTP Server.
- Select the Enabled checkbox to activate the FTP server.
- In the FTP User field, enter
root. - Click on APPLY to save the changes.
Install MariaDB and Firefly III in Unraid
Before installing Firefly III in Unraid, we must set up a database to store your financial transactions. For this purpose, we will use MariaDB. Follow the steps below to install MariaDB and Firefly III in Unraid.
Install MariaDB in Unraid
To install MariaDB in Unraid, follow these steps:
Log in to your Unraid server and navigate to the APPS tab.
Search for
mariadb officialand click on Install.In the container template page, make the following changes:
- Port:
3306 - Database Name: Enter the same database name you copied from Portainer earlier.
- Database User: Enter the same database user you copied from Portainer earlier.
- Database Password: Enter the same database password you copied from Portainer earlier.
- Port:
After entering your credentials, click on APPLY. Note that if you want to save your credentials later, they will be displayed again in the Command execution output.
Once the installation is complete, click on DONE.
Go to the DOCKER tab, find the MariaDB container, and click on it to stop it.
Install Firefly III in Unraid
To install Firefly III in Unraid, follow these steps:
- Log in to your Unraid server and navigate to the APPS tab.
- Search for
FireFlyand click on Install. - In the container template page, make the following changes:
- WebUI: Select
Port not allocated or Well known. - APP-KEY: Generate a random key using a tool like CyberChef’s Pseudo-Random Number Generator
- DB_HOST: Enter the IP address of your Unraid server.
- DB_Port: Enter
3306. - DB_CONNECTION: Select
mysql. - DB_DATABASE: Enter the same database name you copied from Portainer earlier.
- DB_USERNAME: Enter the same database user you copied from Portainer earlier.
- DB_PASSWORD: Enter the same database password you copied from Portainer earlier.
- WebUI: Select
- Click on APPLY to apply the changes.
- Once the installation is complete, click on DONE.
- Go to the DOCKER tab, find the Firefly III container, and click on it to stop it.
Connect to OpenMediaVault and Unraid via FTP using FileZilla
In this step, we will connect to OpenMediaVault and Unraid servers using FileZilla, a free and open-source FTP client. This will allow us to transfer files and make changes between the two servers quickly.
To begin, make sure you have FileZilla installed on your local machine. If you haven’t already, you can download it from the official website: FileZilla .
Let’s proceed with connecting to both servers using FileZilla. Please follow along with the next steps.
Connect to OpenMediaVault via FTP using FileZilla
To establish a connection to OpenMediaVault via FTP, follow these steps:
- Open FileZilla and create a new connection by clicking on File > Site Manager > New Site.
- Enter the host address of your OpenMediaVault server, and set the port number to 22 (not 21).
- Select SFTP as the protocol.
- Login with the root credentials.
Once connected, locate the folder where the old FireFly III database is stored. If you’re unsure where to find it, you can check the Inspect section of the container in Portainer for more information.
- Download all the contents of the folder to your local machine.
Note: Make sure to download all the necessary files and folders, as they will be required for the next steps.
Connect to Unraid via FTP using FileZilla
To connect to your Unraid server via FTP, follow these steps:
- Open FileZilla and login to your Unraid server using the FTP credentials you set up earlier.
- Navigate to the directory of the MariaDB-Official container. You can find this information in the DOCKER tab under Volume Mappings, which should be
/mnt/user/appdata/mariadb-official/data. - Delete all the files and folders in the
datadirectory. - Upload the FireFly III database files you downloaded from OpenMediaVault earlier to the
datadirectory.
Note: Make sure to upload all the necessary files and folders, as they will be required for FireFly III to function correctly.
Start MariaDB-Official and Firefly III in Unraid
Now that we’ve migrated the database files let’s start the MariaDB-Official and Firefly III containers in Unraid.
- Go to the DOCKER tab in Unraid and click on the Start button for the MariaDB-Official container.
- Open the MariaDB-Official container logs to check for errors. If you encounter any issues, you’ll need to troubleshoot and resolve them before proceeding.
- If the MariaDB-Official container starts successfully, click on the Start button for the Firefly III container.
- Monitor the logs for the Firefly III container to check for errors. If you encounter any issues, troubleshoot and resolve them before proceeding.
- If both containers start successfully, navigate to the Firefly III WebUI by entering your web browser’s IP address and port number. The format for this is
IPAddress:Port, whereIPAddressis the IP address of your Unraid server andPortis the port number you specified in the Firefly III container settings.
For example, if your Unraid server IP address is 192.168.1.100 and the port number is 8080, you would enter http://192.168.1.100:8080 in your web browser.
If everything is set up correctly, you can now access the Firefly III WebUI and manage your finances.
Enable Tailscale for Firefly III
One key benefit of using Firefly III to manage my personal finances is the ability to access it remotely and make informed financial decisions. We’ll use Tailscale to create a secure VPN connection to the server to enable this feature.
Step 1: Enable Tailscale in the Firefly III Container
- Go to the DOCKER tab and click on the Firefly-III icon to stop the container.
- Click on the icon again and select Edit.
- In the container template page, switch the Use Tailscale option to ON.
- Provide a Tailscale Hostname and change Tailscale Serve to No.
- Click on APPLY.
If you receive the following error, don’t worry! We’ll fix it in the next step.
Installation Done!
ERROR: Couldn't detect persistent Docker directory for .tailscale_state!
       Please enable Tailscale Advanced Settings in the Docker template and set the Tailscale State Directory manually!
Step 2: Configure Tailscale Advanced Settings
- Scroll down to the Tailscale Show Advanced Settings option and turn it ON.
- Copy the directory path in the Upload path
/mnt/user/appdata/firefly-iiito Tailscale State Directory and add.tailscale_stateto the end. It should look like this:/mnt/user/appdata/firefly-iii/.tailscale_state. - Click on APPLY.
- After the command finishes successfully, click on VIEW CONTAINER LOG and click on the URL to authenticate.
Step 3: Enable Tailscale Serve
- Return to the DOCKER tab and stop the container.
- Click on Edit again.
- Navigate to Tailscale Serve and switch it to Serve.
- Ensure your Tailscale DNS settings have MagicDNS and HTTPS Certificates enabled. You can check this by going to Confirm your Tailscale DNS settings .
- Click on APPLY and VIEW CONTAINER LOG to authenticate again to Tailscale.
Note: Due to redundancy, Tailscale may create two machines. You can delete both machines and restart the container to fix this issue.
Final Step: Disable Key Expiry
- Click on the container icon to edit and click on Disable key Expiry.
- Find your container, click on the
..., and select Disable key expiry.
Suppose you’re having trouble with these steps. In that case, I highly recommend watching Ed from the Uncast Show’s video on The Ultimate Guide to Tailscale on Unraid - Chapter Integrating Tailscale into individual Docker Containers .
Monitor Everydollor
Now, you can track your expenses and have remote access to the application. Be sure to empower yourself with the mobile app, Abacus .