
The Evolution of EVE: Lessons from a Home Lab Enthusiast
In an era where data drives everything from work to leisure, the Network-Attached Storage (NAS) concept has moved from corporate server rooms to the homes of tech enthusiasts. My story of starting with OpenMediaVault on a Raspberry Pi 3 Model B+ in 2019 and evolving through a series of hardware upgrades and software experiments to my current ZimaBlade powered by Unraid EVE 6.0 is a testament to the power of curiosity, adaptability, and the never-ending quest for optimization.
The Power of Personalization in Tech
When I first began with OpenMediaVault, I joined a community of DIY NAS builders who recognized that prebuilt solutions like Synology or QNAP were convenient but lacked flexibility. I started with a Raspberry Pi because it is affordable, low-power, and ideal for experimentation. However, as my needs grew, so did the limitations of my hardware and operating system. My eventual transition to Unraid illustrates a fundamental truth about technology—what works for one person doesn’t necessarily work for another.
Unraid’s modularity, ease of use, and ability to handle tasks like virtualization and Docker containers with minimal fuss set it apart. It reminds those building their home labs that the right solution isn’t always the most popular one—it’s the one that best meets your needs.
Lessons Learned: The Importance of Documentation
I admit that the lack of documentation in earlier versions of EVE was a regret that struck a chord. Many hobbyists dive into projects enthusiastically, only to realize later that the absence of detailed records makes troubleshooting and upgrading more challenging. By committing to documenting EVE 6.0, I’m not only ensuring that future-me will thank me, but I’m also contributing to the collective knowledge of the home lab community.
Documentation isn’t just about keeping a record; it’s about empowerment. A well-documented setup guides others, particularly those new to NAS building, who might feel overwhelmed by the jargon, configuration options, and hardware choices.
The Birth of EVE 6.0
Here begins the birth of EVE 6.0 on a ZimaBlade powered by Unraid 6.12.14. This section will cover the complete setup, including specific configurations and hardware upgrades.
EVE 6 Hardware
The list of hardware used for setting up EVE 6.0, including the upgrades to the current version.
- ZimaBlade DeskBuild NAS Kit
- Two 4TB Western Digital 4TB Red PRO 7.2K 256MB 3.5
- Two 1TB 2.5 SSDs
- DC 5525 To SATA Hard Drive Power Supply Cable DC 12V To 4Pin
- Power Supply Adapter 12V 10A
- Four Ports PCIe SATA Expansion Card
- Air cooling fan
- Four SATA Cable III
- Two 16GB Flash Drive USB 3.0
- PC Mounting Screws M3 x 1/4
- Zip ties
RAM Installation on the ZimaBlade
The ZimaBlade does not come with pre-installed RAM, so install it before booting into the OS. ZimaBlade 16 GB RAM installation .
Installing Unraid on the ZimaBlade
This section guides you through installing Unraid OS on the ZimaBlade and logging into the operating system.
Unraid USB Flash Creator
Download the Unraid USB Creator and create a bootable flash drive.
Booting the ZimaBlade into Unraid OS
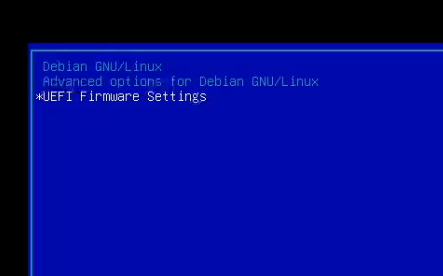
Connect a monitor, keyboard, Ethernet cable, and power cable to the ZimaBlade to make changes to the BIOS, including enabling booting from the USB flash drive. When the ZimaBlade logo appears on the screen, press Del to enter the boot menu and configure your settings. Select UEFI Firmware Settings and press the Enter key. The system will then reboot into the BIOS.
Then, navigate to Advanced > CPU Configuration.
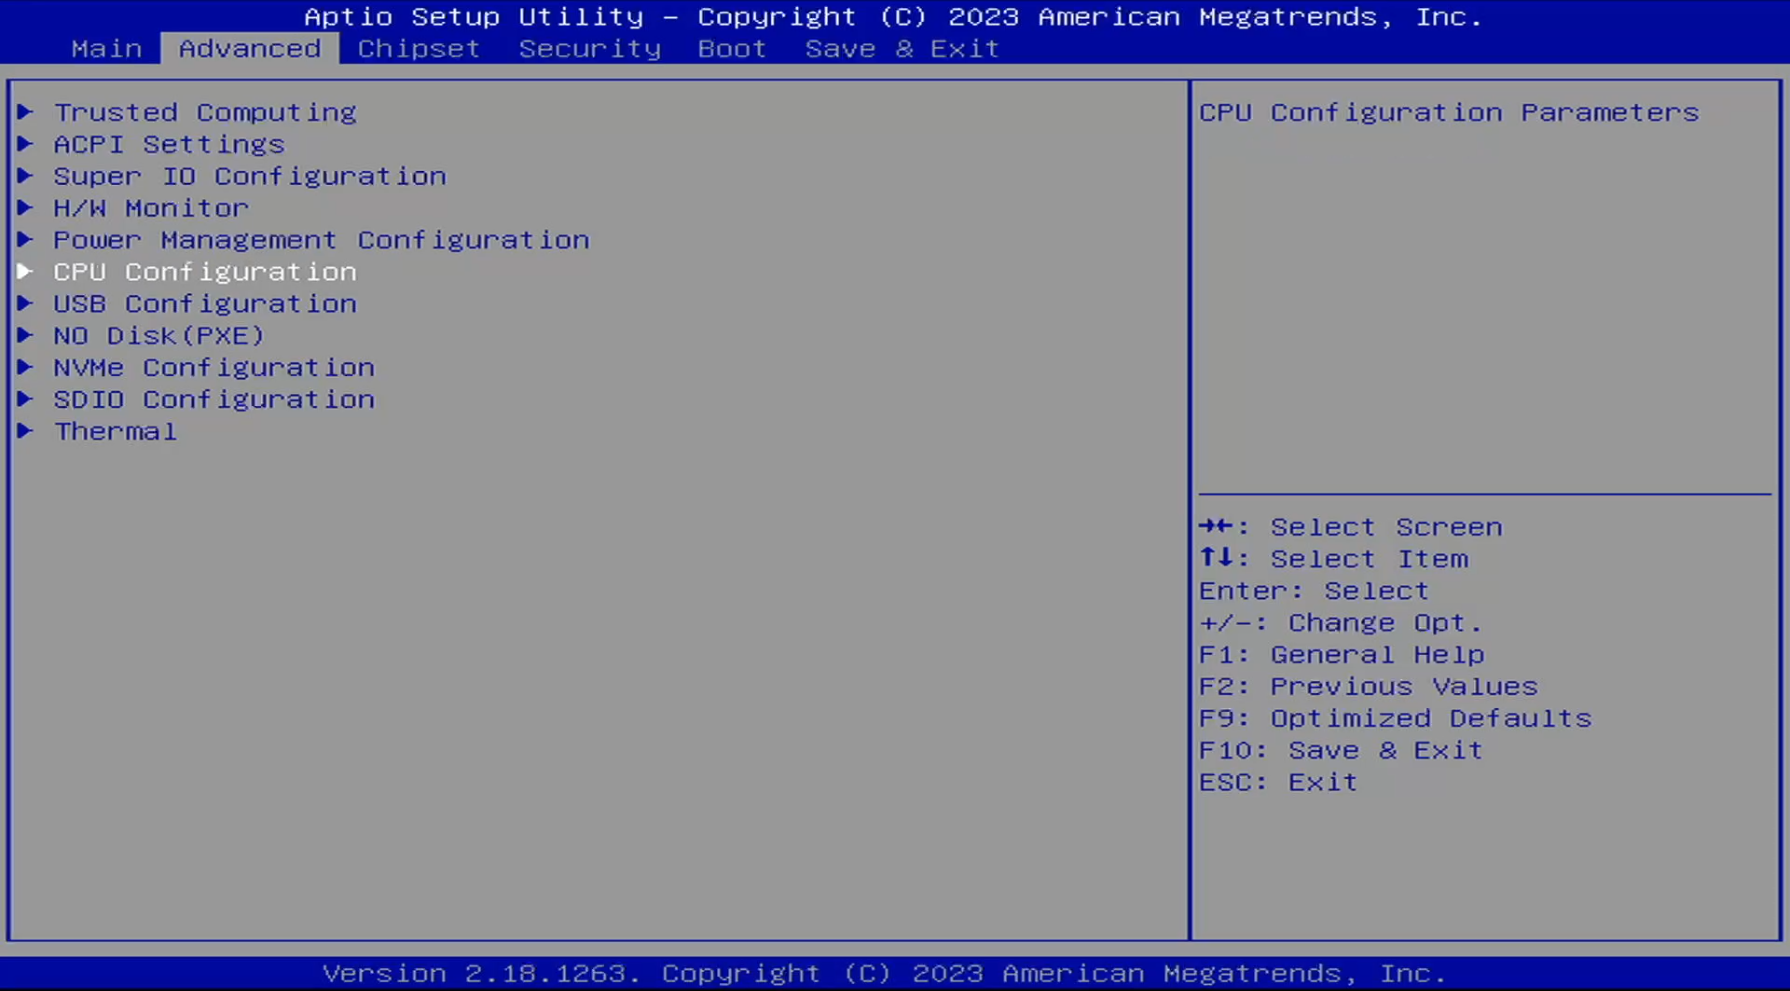
By default, Intel Virtualization Technology is enabled, but I will enable VT-d as well.
Let’s enable Wake on PME as I want to experiment with turning EVE back on incase of a power outage. To enable this setting, navigate from the Advanced tab to Power Management Configuration > Wake on PME and enable

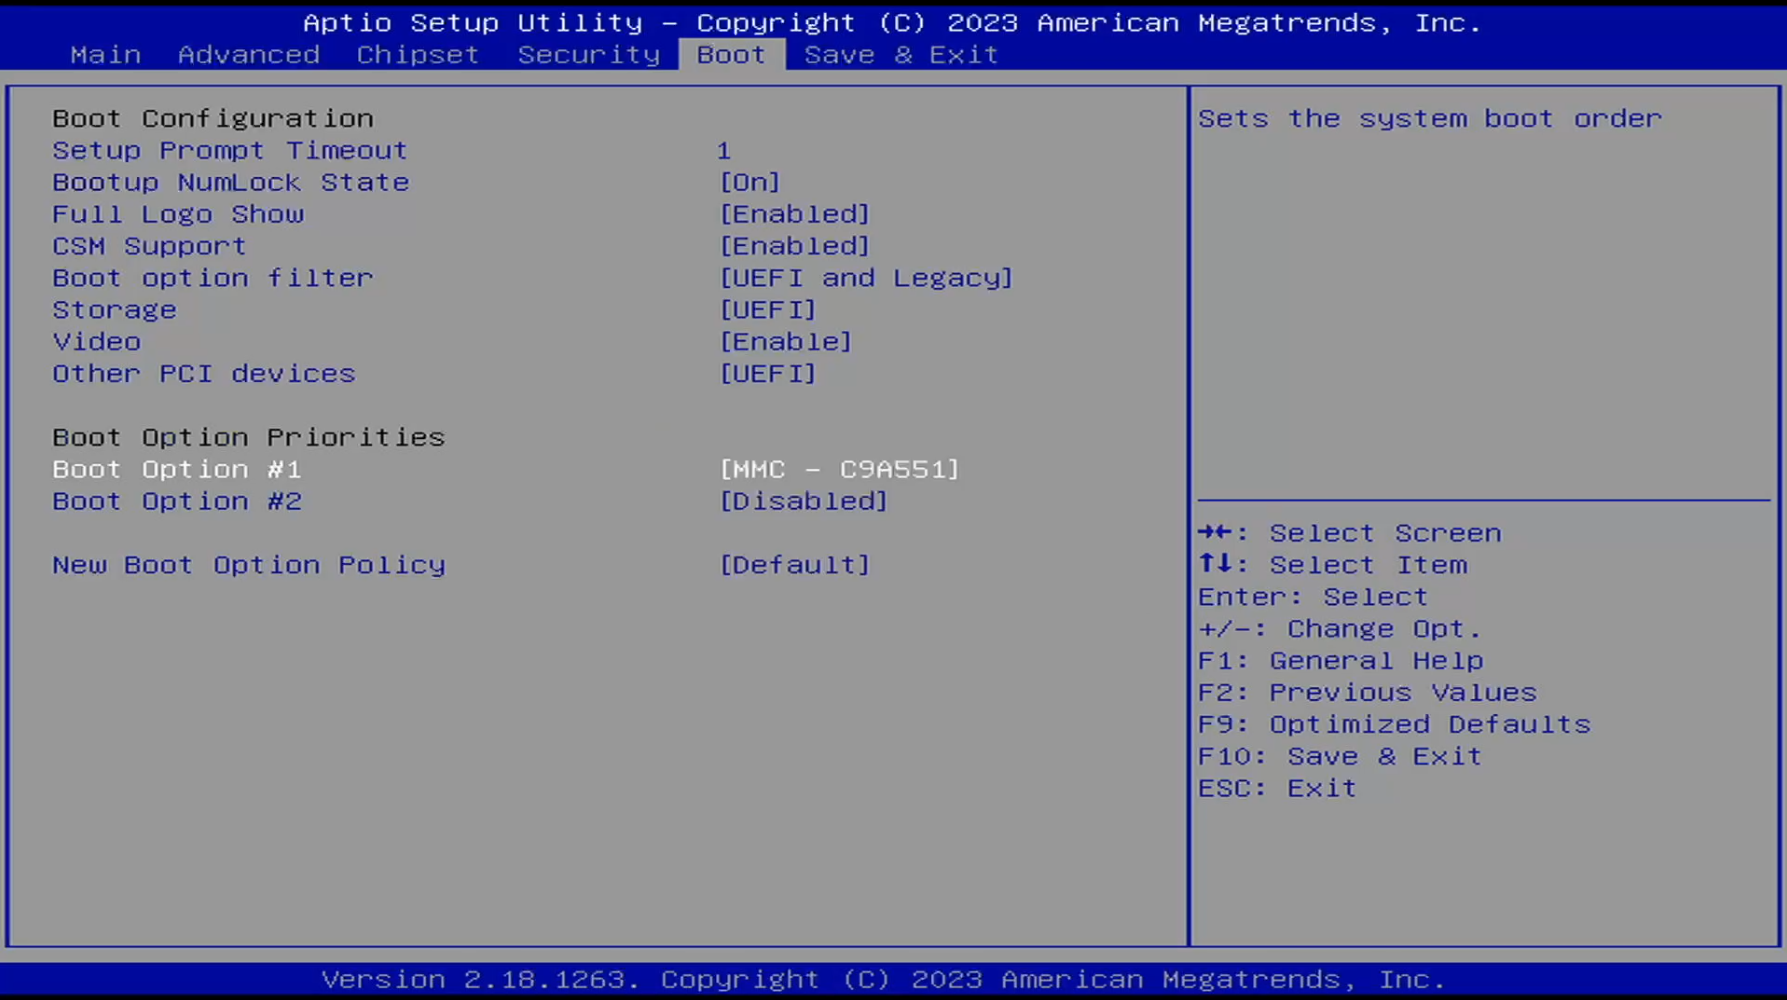
The last change will be to disable the Boot Option Priorities to allow the system to boot from the Unraid OS USB flash drive. Navigate to the Boot tab and disable Boot Option #1 and Boot Option #2.
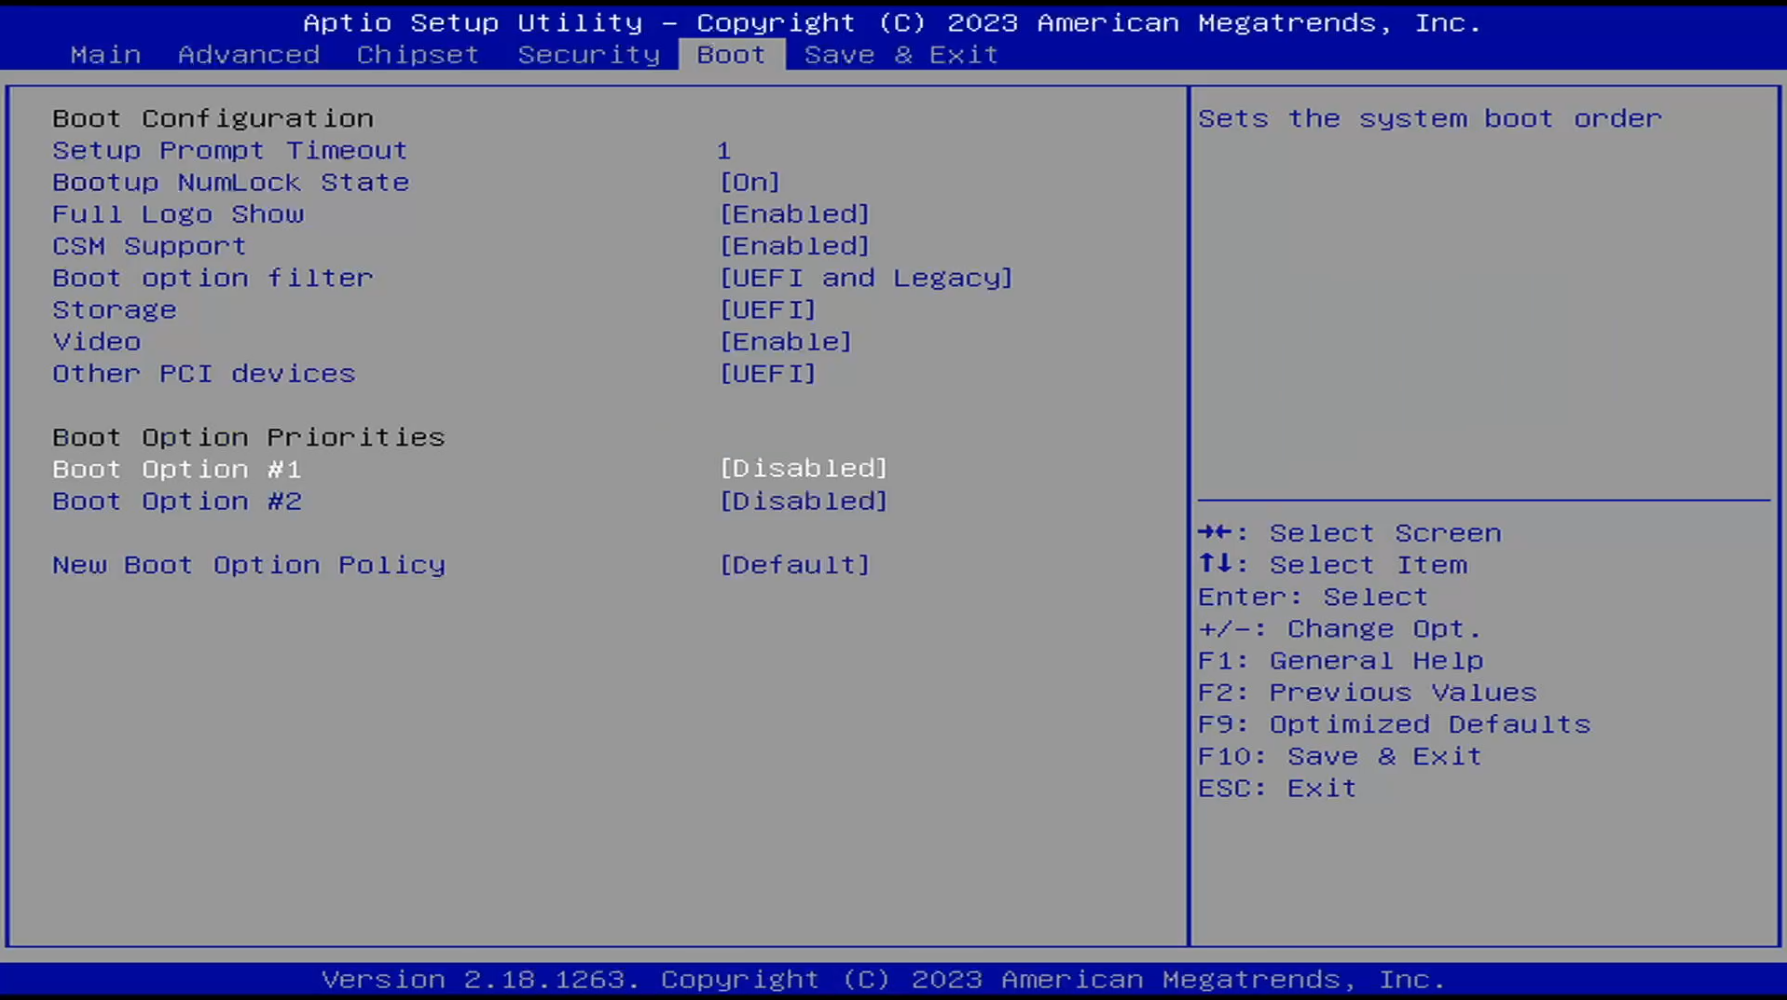
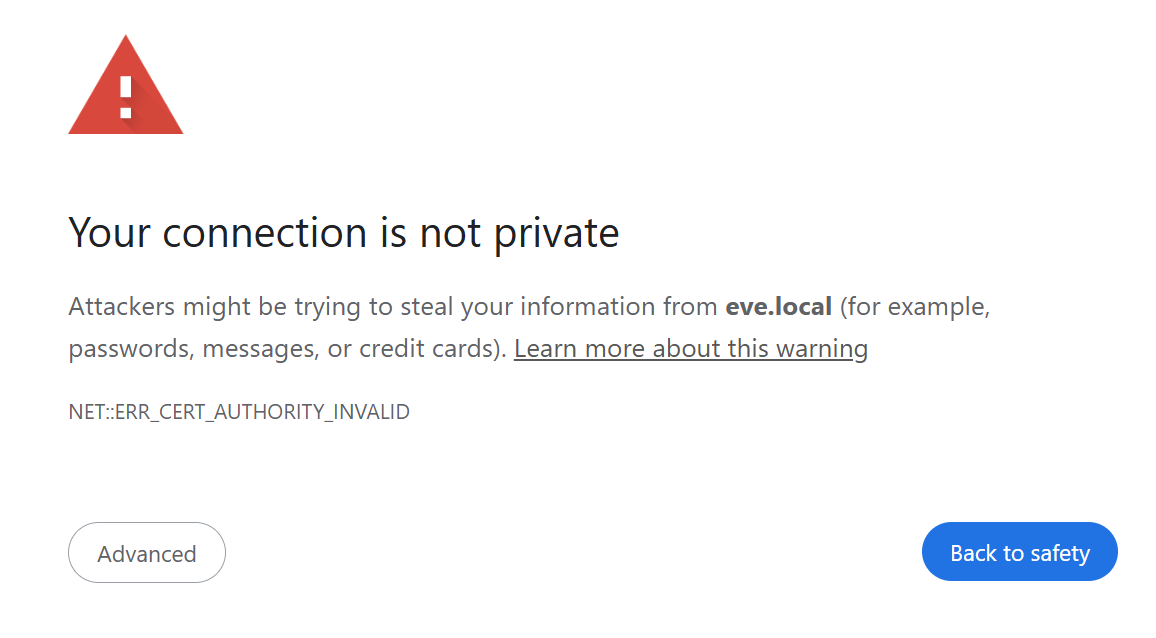
Finally, navigate to the Save & Exit tab and select Save Changes and Exit. The system will reboot to the Unraid OS flash drive, and your IP address will appear on the screen. You can access the Unraid OS from any browser connected to the network by typing tower.local or by entering the IP address. In my case, it will be EVE.local.
First Login to Unraid on EVE 6.0
During your initial login to Unraid, you may encounter a Warning: Potential Security Risk Ahead message. This is expected due to the self-signed SSL certificate. Click on Advanced and proceed to accept the risk.
Once inside, you’ll be prompted to set up a secure password to protect and access your Unraid OS. Take a moment to choose a strong password.
Connecting SSDs and HDDs to ZimaBlade EVE
Shutdown the system and unplug it from the power sources. Then, let’s connect the SSDs and HDDs to the ZimaBlade EVE to start the self-test. I will opt to connect the SSDs via the SATA Y-Cable that came with the ZimaBlade DeskBuild NAS Kit . The ZimaBlade should have enough power for the two SSDs.
I am connecting one of the 1 TB 2.5 SSDs to the ZimaBlade, as the other 1 TB SSD is currently being used by EVE 5 in OpenMediaVault. This will require me to transfer data to EVE 6.0; more details on this process will follow in another article.
Next, I connected the Four Ports PCIe SATA Expansion Card to the PCIe slot. To secure it, I used a zip tie to hold it in place. Then, I connected the SATA cables from the PCIe to SATA adapter to the HDDs and used the DC 5525 To SATA Hard Drive Power Supply Cable DC 12V To 4Pin to power the HDDs.
Finally, I connected the Power Supply Adapter 12V 10A .
With all hardware pieces connected, the system is ready for a boot. The Unraid Starter license allows me to attach up to six storage devices, so this setup is ready for future storage extensions.
Running Self-Tests on Drives
After logging in, navigate to the Dashboard tab and locate the unassigned (STOPPED) widget with the drive icon.
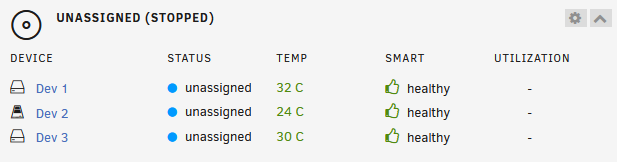
Click on each drive name, and on the new page, click on Self-Test. Start the SMART extended self-test for each drive. Note that this process may take some time to complete.
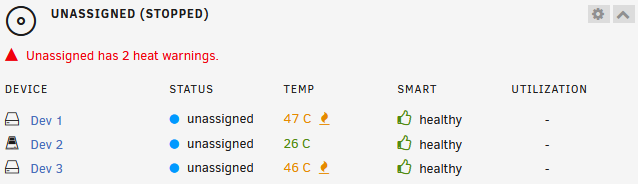
During the process, I received heat warnings for the HDDs, even though they were installed in the 2-Bay HDD Rack Tray included with the ZimaBlade DeskBuild NAS Kit . To address this, I repurposed an unused office desk air cooling fan , effectively lowering the HDDs’ temperatures to 33°C. This fan will now be part of the hardware setup, as proper cooling is essential for the HDDs’ performance and longevity.
Everything has been completed without errors, and EVE is now upgraded to version 6.2, including the cooling upgrade.
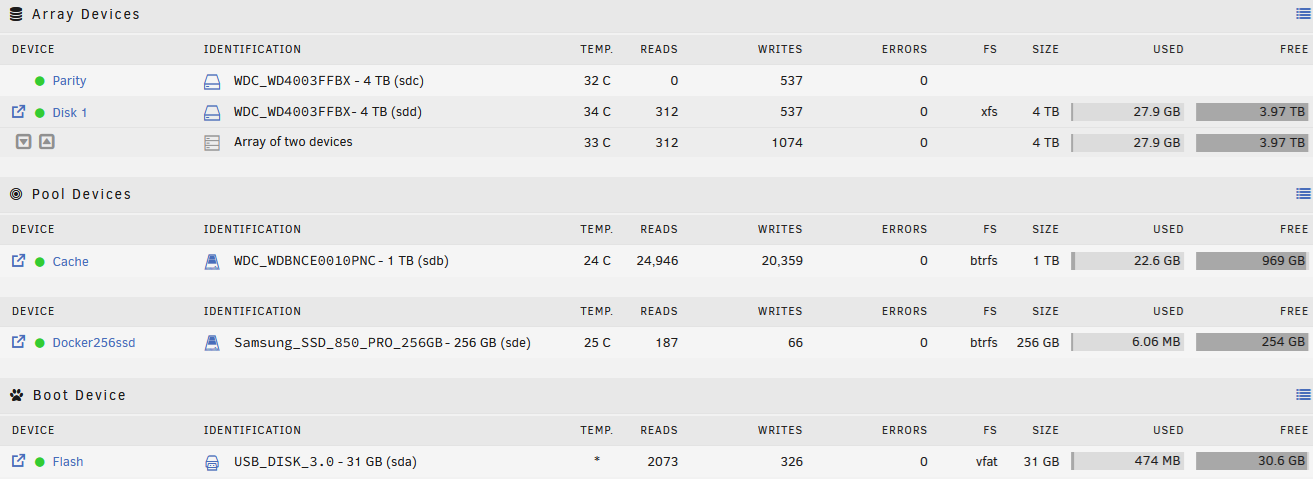
Array Devices
From the Unraid WebGUI, navigate to Main. For the EVE setup, I have opted for one 4 TB HDD parity device, one 4 TB disk, and one 1 TB SSD cache pool. After transferring data from the second 1 TB SSD connected in OpenMediaVault, I will add it as a pool device, increasing the cache pool from one 1 TB SSD to two 1 TB SSDs. The 1 TB SSDs will be assigned for Docker images and VMs.
After selecting the devices, scroll down to Array Operation and click on START.
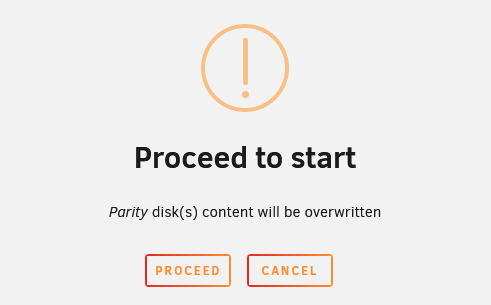
Lastly, click on PROCEED.
Navigate to the Dashboard tab to monitor the status of the syncing progress. We will wait for the parity-sync to complete before proceeding further.
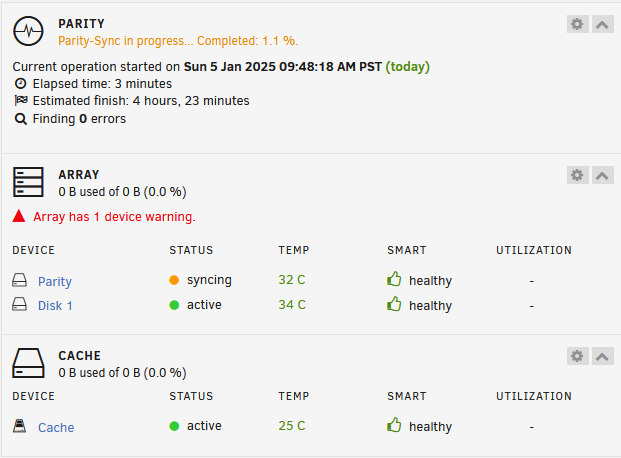
Add Users
From the Unraid WebGUI, navigate to USERS and add the required users for the setup. This will allow you to assign a share for each user.
Format Drives
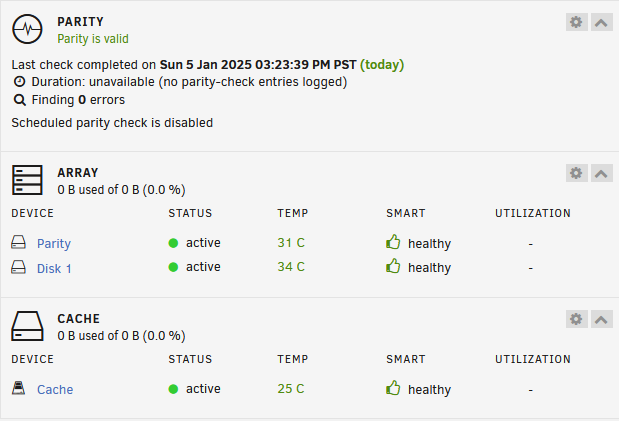
After the parity status changes to Valid, we are ready to add our shares for users to access. The primary purpose of my NAS setup is to provide a central location for files shared among family members.
We must format the disks before creating shares; otherwise, the logs will display the following error:
EVE emhttpd: error: cmdEditShare: missing csrf_token
To format the disks, navigate to the MAIN tab, scroll to the Array Operation section, and check the box to format the disks. After reading the WARNING message, click OK and then FORMAT.

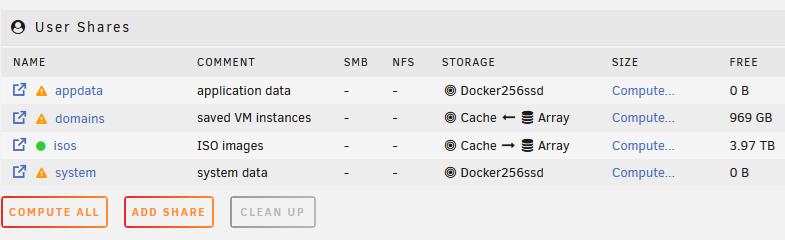
Once the OS completes the format, navigate to the SHARES tab to view the User Shares and become familiar with the system files.
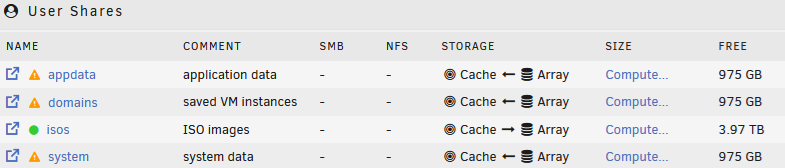
Each file share is defined in the comment column. For further clarification, refer to the Unraid Docs on Default Shares .
Optimizing Shares After Adding the Unplanned SSD
While checking old hardware, I found a 256 GB SSD and added it to the array as a disk, which will be assigned to Docker images and data. The process was simple: I stopped the array, connected the SATA and power cables to the SSD, and performed a system reboot. Afterward, I ran a SMART extended self-test and formatted the drive.
This change wasn’t counted for, so I must update the appdata and system directory shares.
- Navigate to the MAIN tab and scroll down to the Array Operation section.
- Click on STOP to take the array offline.
- In the devices section, click on ADD POOL to create a specific pool for Docker to store and host data from the 256 GB SSD.
- Name the pool and click ADD.
- Click START under the Array Operation section to bring the array back online.
If you make any misconfigurations and need to move things around, you can reference the Unraid Docs for Shrink Array .
Next, navigate to the SHARES tab and click appdata. Make the following changes to improve Docker performance:
- Primary storage (for new files and folders):
Docker256ssd - Secondary storage:
None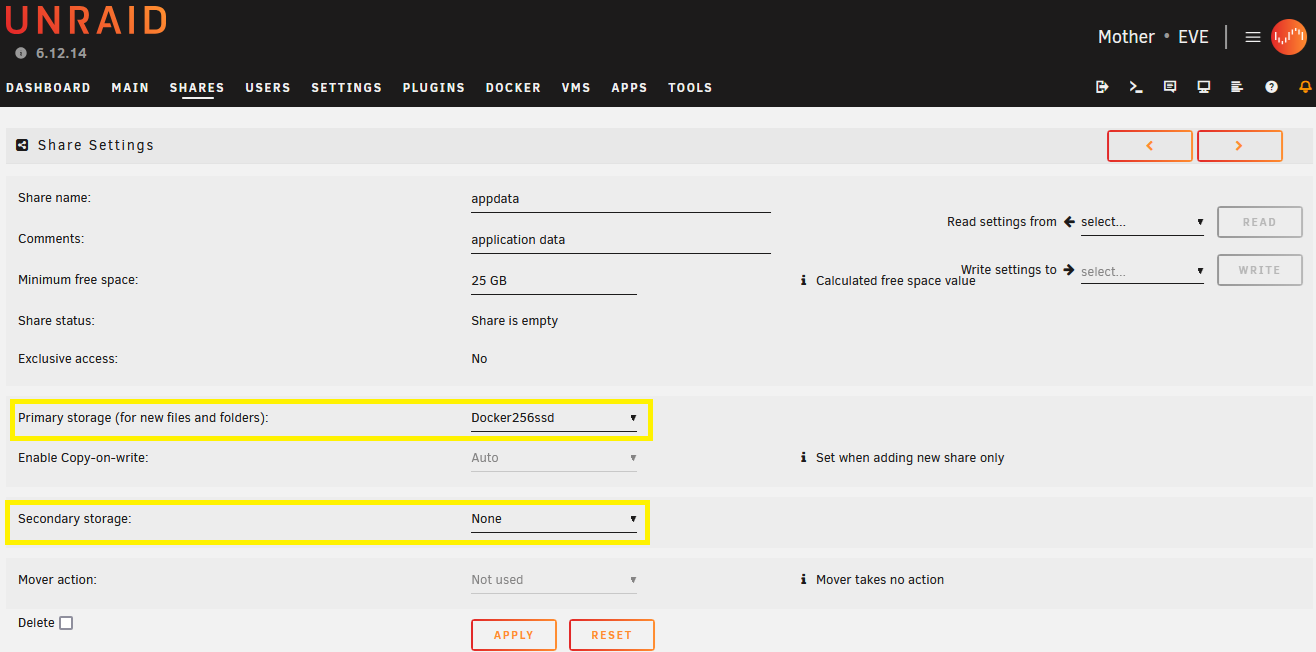
Repeat the same changes for the system share.
Now, the User Shares look as follows:
EVE is growing up so fast; we are now at version 6.3!
Adding Shares
Navigate to the SHARES tab and click on ADD SHARE. I configured this setup based on my understanding of my needs, but I’m open to feedback to further optimize performance and extend the hardware’s lifespan.
Public Share Configuration
This share is for publicly accessible files, where everyone can dump and transfer data.
- Share name:
Public - Comments:
Data shared between users - Minimum free space:
0 - Primary storage (for new files and folders):
Array - Allocation method:
High-water - Split level:
Automatically split any directory as required - Included disk(s):
All - Excluded disk(s):
None - Secondary storage:
None - Mover action:
Not used
SMB Security Settings:
- Export:
Yes - Security:
Public
This configuration suits the purpose of a low-priority, temporary storage space for data that is often moved or deleted. The minimal read/write requirements and usage across all array devices aim to balance performance and longevity.
Private Share Configuration
For shares requiring frequent read and write operations, such as storing documents or editing media files, I utilize the cache (SSDs) for better performance. Here’s the configuration:
- Share name:
Bader - Comments:
Bader Directory - Minimum free space:
0 - Primary storage (for new files and folders):
Cache - Enable Copy-on-write:
Auto - Secondary storage:
Array - Allocation method:
High-water - Split level:
Automatically split any directory as required - Included disk(s):
All - Excluded disk(s):
None - Mover action:
Cache -> Array
SMB Security Settings:
- Export:
Yes - Security:
Private
This setup ensures that frequently accessed files benefit from SSD speeds while maintaining data redundancy by moving files to the array.
Some configurations are constrained by the number of arrays and disks attached to EVE, but the setup balances usability and hardware longevity. Suggestions to further optimize are always welcome!
EVE is evolving quickly—now upgraded to version 6.4!
Connect to Shares from a Windows Device
I set the EVE.local IP address to static in the router, assigning it to 10.10.10.0. This will help with future Docker and networking configurations.
The setup process may vary depending on your operating system to access the shared files or directories we created. Using your favorite search engine or AI for how to connect to SMB will provide platform-specific instructions. I used the steps to connect from Windows devices.
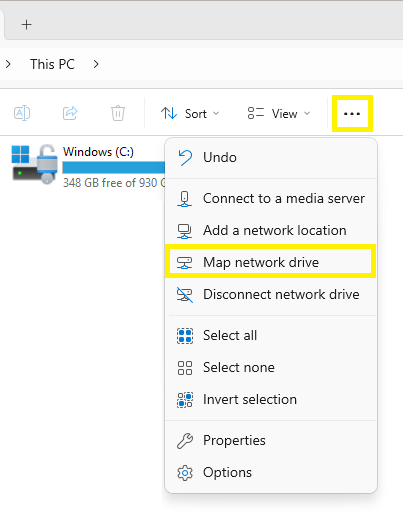
- Open File Explorer.
- Click on This PC and then the
...icon (or the “See more” menu). - Select Map Network Drive.
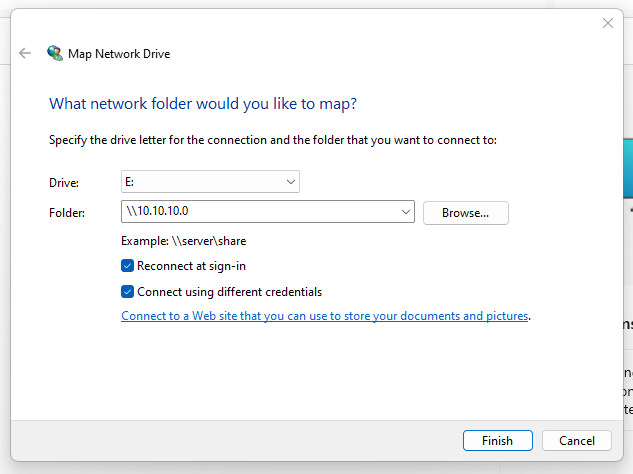
- Enter the server name or IP address, such as
eve.localor10.10.10.0, to connect to your shares.
If you encounter any issues:
- Ensure your Wi-Fi settings are set to Private.
- Navigate to the Network settings and enable Sharing.
Why a NAS Is More Than Just Storage
The journey I have outlined isn’t just about building a place to stash my files. It’s about control, privacy, and the joy of creating something tailored to my needs. A personal NAS allows me to:
- Store and back up data securely.
- Run virtual machines or Docker containers for a variety of applications.
- Experiment with cutting-edge technology in a low-risk environment.
For those reading my story, the inspiration lies in the accessibility of this tech. Starting small with a Raspberry Pi and scaling up to systems like ZimaBlade demonstrates that this journey isn’t just for IT professionals. It’s for anyone willing to learn.
EVE isn’t just a NAS; it’s a beacon of what’s possible when curiosity meets determination.
Unraid OS 7.0.0 Update Now Available
Every new update or configuration on platforms like Unraid goes beyond adding cool features or improving user interfaces. It’s all about enhancing stability and reliability and uncovering hidden potential. It’s exciting to see that the latest step for EVE involves transitioning to Unraid OS 7.0.0 , showing a commitment to staying at the forefront of development.
After checking out the changelog and hearing positive feedback from others about the new release, EVE is all set for the update.
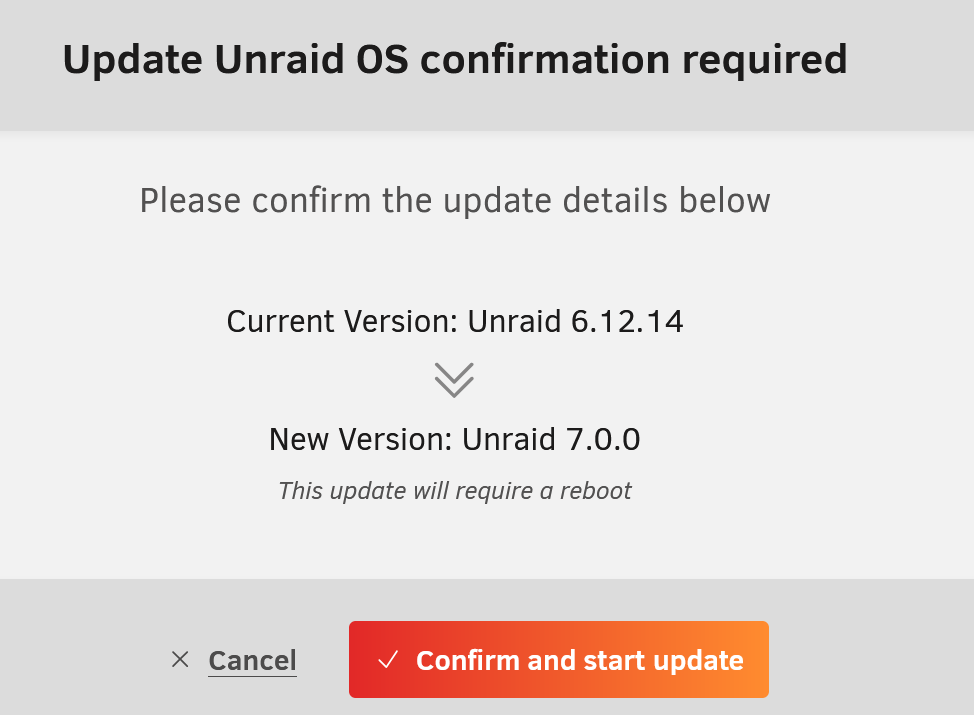
The process is straightforward. The user interface guides you through each step and tells you what to expect.
Wait until you see the following message, then reboot your system.
Update successful - PLEASE REBOOT YOUR SERVER
plugin: unRAIDServer.plg installed
Executing hook script: post_plugin_checks
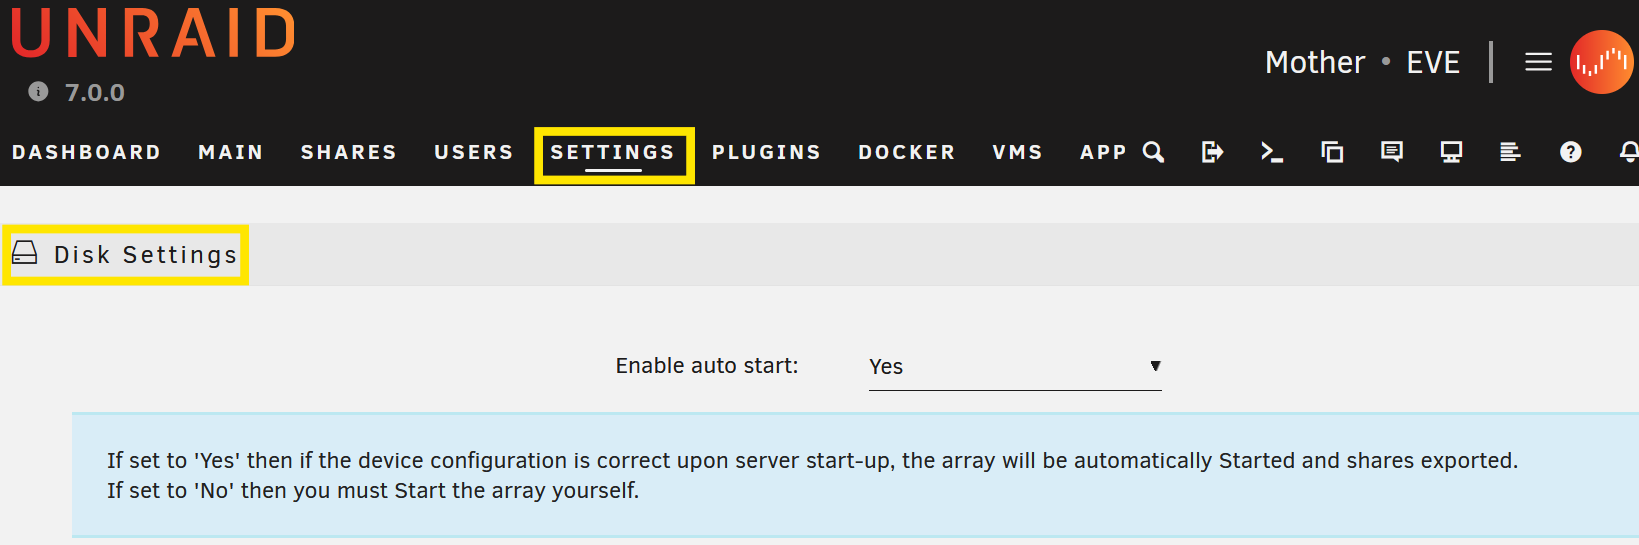
After the reboot, log in to the server and go to the MAIN tab. From there, navigate to Array Operation and click on START. This will be a small change in the settings, as I want the array to start automatically after a reboot Enabling Auto-start for Unraid Array .
Unraid SETTINGS
The upcoming changes will be found under the SETTINGS tab. While some settings will remain the default, I will provide ongoing documentation to update the article if any changes occur.
Changing Time Zone and Adding NTP Servers for Redundancy
Navigate to the System Settings section and click on Date and Time to adjust your preferred settings. Update the Time Zone and add two additional NTP servers: time.nist.gov and us.pool.ntp.org. Once you’ve made your selections, click on APPLY.

Enabling Auto-start for Unraid Array
In the System Settings section, navigate to Disk Settings, and switch the Enable auto start to Yes. Then, click on APPLY. This change will ensure that the arrays start automatically after each restart, eliminating the need for manual intervention. However, it’s important to know that a manual start may still be necessary if there are issues or changes with the arrays.
Enable SSH to access EVE and Secure it via TLS
In the System Settings section, navigate to Management Access, switch Use SSH to Yes, then click on APPLY. I also chose to enable Use SSL/TLS by switching it to Yes because enhancing security is always a good choice, even with a self-signed certificate.
Note: After you install Tailscale plugin revisit this page to see the changes.
UPS Settings and Safe Shutdown
The ZimaBlade has a single USB port, currently occupied by the flash drive operating Unraid. To manage the connection to the UPS, I’ve ordered a Multiport USB-C Hub Adapter and a USB to RJ50 Cable . Although I experienced some success, several issues arose. I couldn’t deliver power to support the ZimaBlade, possibly due to the 100W USB-C Hub requirements. Since using the USB-C port wasn’t an option, I shutdown the system and unplugged the flash drive. Then, I used a USB-C Female to USB Male adapter to connect the flash drive running Unraid OS and the USB to RJ50 Cable to the UPS. While this setup wasn’t ideal, it successfully connected to the UPS, albeit with additional challenges requiring further testing, as I couldn’t pinpoint all the issues.
After connecting the USB to the RJ50 Cable, Unraid detected the setup, and I conducted two tests by unplugging the UPS to simulate data interruptions. During this, I noticed a clicking sound from one of the HDDs and observed that two indicator lights were off on the Four Ports PCIe SATA Expansion Card . I wasn’t able to login to the EVE webpage or ping the IP address, and to address this, I toggled the switch on the CanaKit 3.5A Raspberry Pi 4 Power Supply with PiSwitch (USB-C) to reboot the system.
Once EVE fully rebooted, the arrays didn’t auto-start, and the parity array was displayed as invalid. I had to remove it, start the array, stop it, and then reattach it, which triggered resyncing. This process was ultimately successful, but it involved several compromises and raised some concerns.
This issue continued as the array parity failed twice more, requiring another round of resyncing. In response, I decided to discontinue using the Multiport USB-C Hub Adapter and instead ordered a Small USB Hub . I’m hopeful that this will allow me to effectively connect both the Unraid OS USB drive and the UPS USB cable. I will update the article to share the results if this setup proves successful.
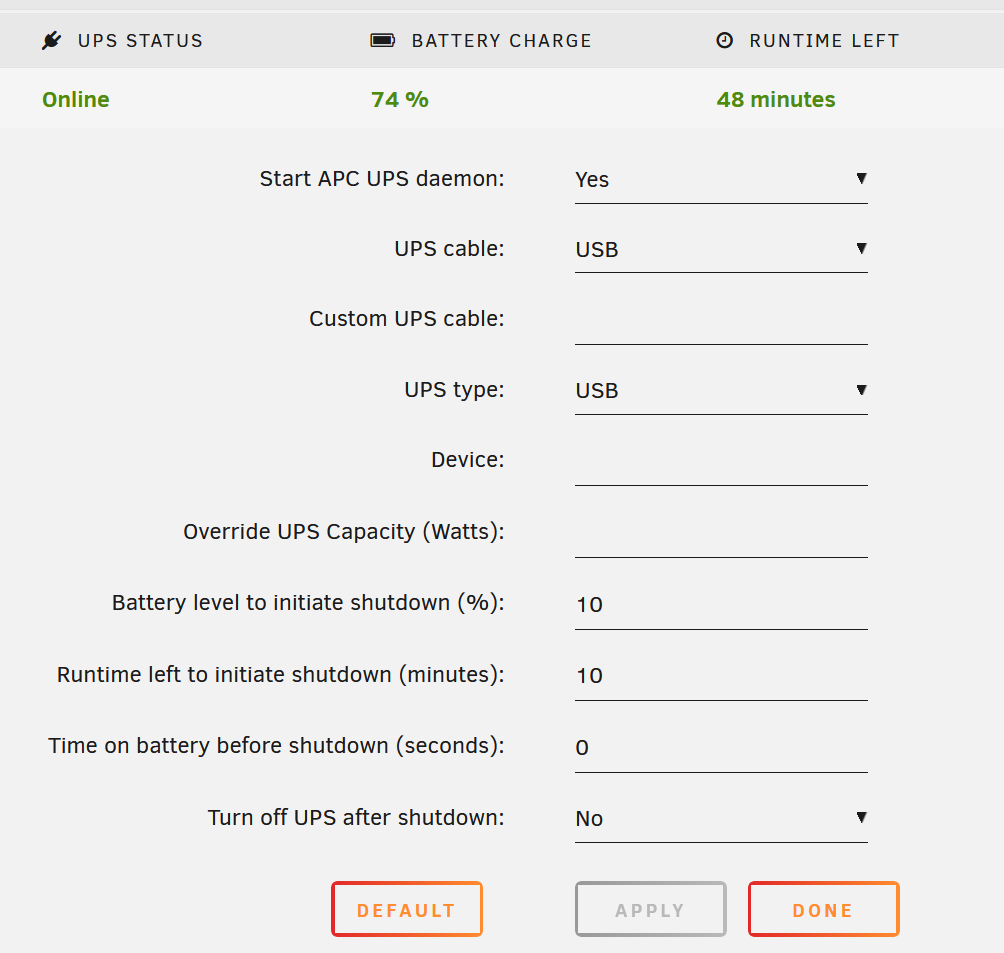
Update 1/20/2025:
- Thankfully, the sound coming from the HDD was caused by a bad SATA cable.
- The Small USB Hub wasn’t meant for EVE; after connecting it, the USB 3.0 port was downward, and I didn’t like having the ZimaBlade upside down. I purchased a 4-port USB Hub , and it has been working for the last three days without any issues.
Install Community Applications
One primary purpose of using Unraid as a NAS home lab server is to open access to web applications running in Dockers containers and plugin applications. To accomplish this, navigate to the APPS tab and click on INSTALL.
plugin: community.applications.plg installed
Executing hook script: post_plugin_checks
Once the installation is complete, click on DONE and make sure to read the disclaimer.
Tailscale (Plugin)
This section, inspired by Ed from the Uncast Show - The Ultimate Guide to Tailscale on Unraid , the plugin will allow me to access EVE when I’m not connected via my LAN, enabling me to access my files when I’m away from home.
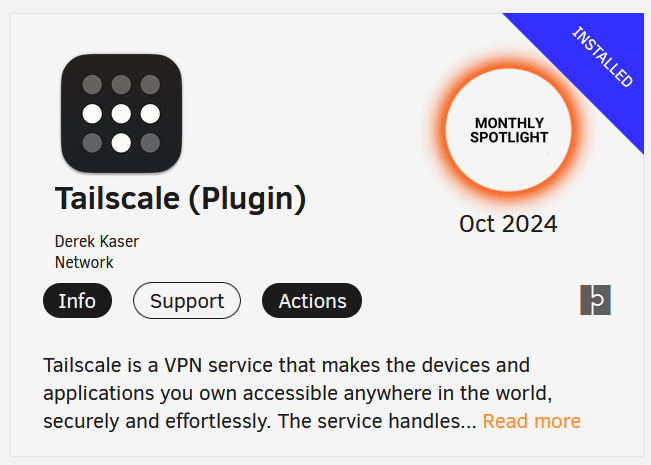
After installing the Tailscale (Plugin) and seeing the following message:
plugin: tailscale.plg installed
Executing hook script: post_plugin_checks
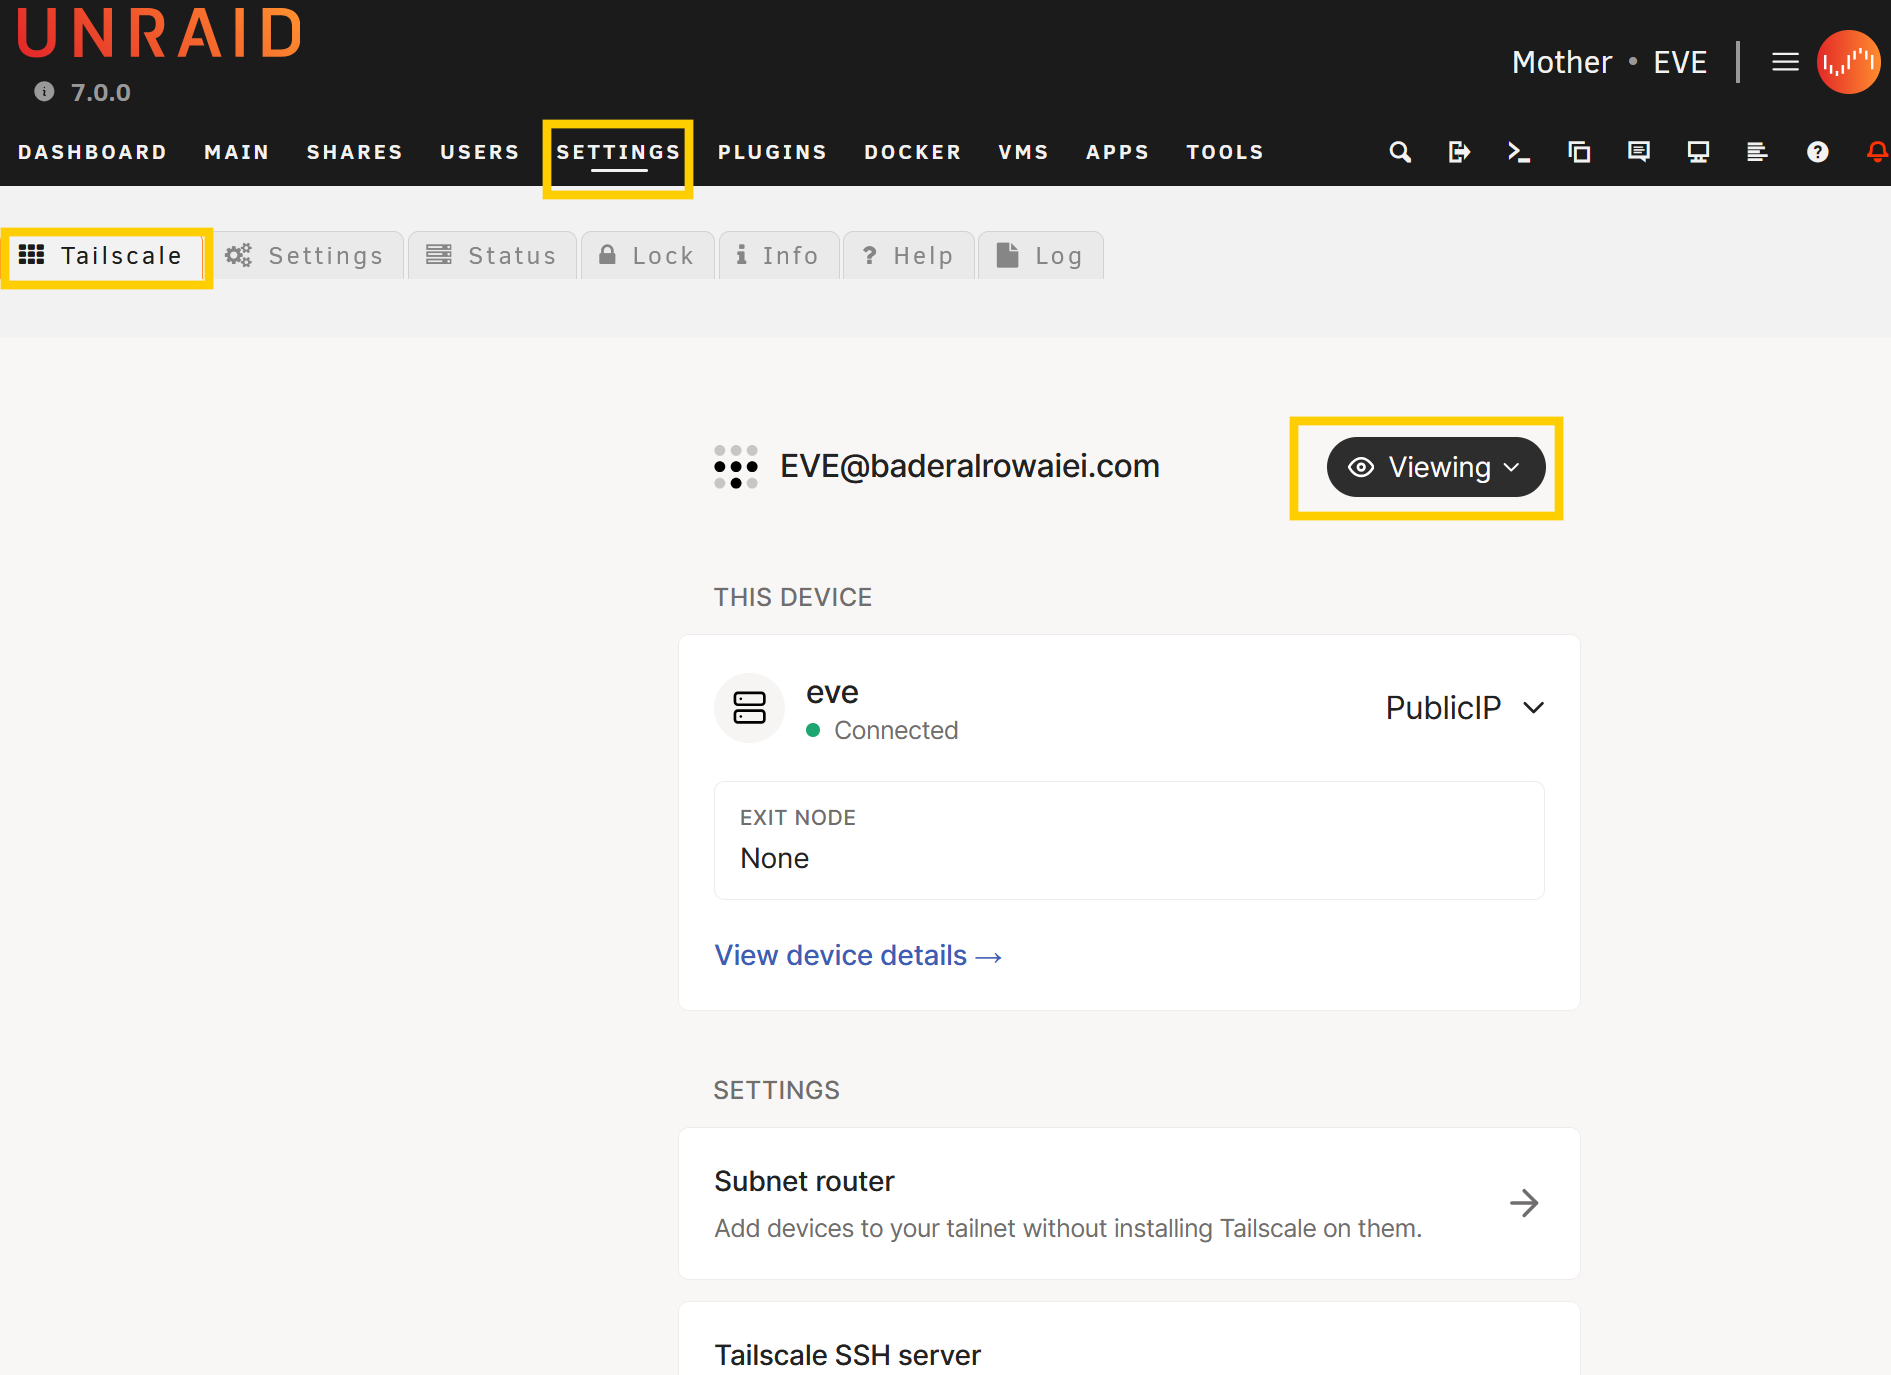
Click on DONE then navigate to the SETTINGS tab under Network Services click on Tailscale. After you login, click on Reauthenticate and log in to Tailscale. Once connected, click on connect. Tailscale will redirect you to the console.
In the Machines tab on the Tailscale admin page, find the added machine (in my case, it is EVE) and click on the three dots ... and select Disable key expiry.
By installing Tailscale and enabling this setting, we’ve provided our server with a VPN connection through Tailscale, allowing us to access it remotely and securely. However, Tailscale’s capabilities extend beyond this. We can enable additional settings for future use, leveraging EVE as a secure remote access network when using public internet connections. This will enhance the online security when using public Wi-Fi.
RECOMMEND to watch
Tailscale Subnet Router Exit Node
This feature allows me to use EVE as a router for my traffic when using public Wi-Fi, enhancing the Internet security connection. To enable the Tailscale Exit Node feature, follow these steps:
- Navigate to the SETTINGS tab, and under Network Services, click on Tailscale. From the plugin settings page, click on Viewing to sign in. If your browser blocks pop-up windows, make sure to allow them.
- Click on Subnet router under the SETTINGS section on the same page. Add your subnet IP address and click on Advertise routes.

- After the page refreshes, follow the instructions: “To approve routes, in the admin console, go to the machine’s route settings.” Click on the machine settings in the Tailscale page, click on Edit, select your IP address, and save.

- Return to the server page and click
<-- Back to evewhere you will see an option to run the exit node.
- Go back to the Tailscale page, and under Routing Settings, click on edit and select “Use as exit node.”
A well-known use case for this feature is connecting to your home network via Tailscale VPN when using public Wi-Fi on your phone or laptop. To do this, after installing the Tailscale app, you need to click on the “Exit Node” option and select the device where the feature is enabled. By doing this, you will route your traffic through your home network for a more secure internet connection.
Explore Subnet routers and Exit nodes (route all traffic) for additional details.
This would conclude for EVE version 6.5!
A Vision Worth Building
At its core, EVE stands as an ode to the power of digital transformation: a project determined to evolve far beyond its initial purpose of basic file-sharing and management. With intentional system design, its potential to become a hub for advanced computing tasks, creative workflows, and even transformative business processes seems attainable. We need platforms that embrace multi-functionality without sacrificing reliability, and EVE may yet serve as a blueprint for what an adaptable, scalable environment can genuinely achieve.
The project might indeed be far from completion, but isn’t that where innovation happens? Systems like EVE remind us of this simple truth: Technology isn’t just a tool—it’s a canvas for imagining the possible.